How to Adjust Air Shocks on Harley Davidson in 2024
To adjust air shocks on a Harley Davidson, locate the convenient air valve between the saddlebag and rear fender. Use a hand air pump to add or release air pressure, depending on your desired riding experience.
Adjusting the pre-load by turning the adjusting collar clockwise or counterclockwise will determine the amount of tension on the spring. Be sure to follow the manufacturer’s guidelines for the appropriate air pressure.
Step 1: Understanding The Rear Suspension System
| How to Adjust Air Shocks on Harley Davidson |
| Step 1: Understanding the Rear Suspension System |
When it comes to adjusting air shocks on a Harley Davidson, it is important to have a good understanding of the rear suspension system. The rear suspension of a Harley Davidson consists of several components, including air shocks, which play a crucial role in providing a comfortable ride.
Overview of the Harley Davidson rear suspension system:
- Explanation of how air shocks work: Air shocks use compressed air to control the suspension and provide a smoother ride. They can be adjusted to match the rider’s weight and riding style.
- Importance of properly adjusted air shocks: Properly adjusted air shocks ensure optimal performance and comfort. It helps to maintain proper balance and stability, especially when riding with a passenger or carrying heavy loads.
In order to adjust the air shocks on a Harley Davidson, you will need to follow specific instructions provided by the manufacturer. It is recommended to consult the owner’s manual or seek assistance from a professional to ensure proper adjustment and avoid any damage to the suspension system.
Step 2: Checking And Adjusting Air Pressure In Shocks
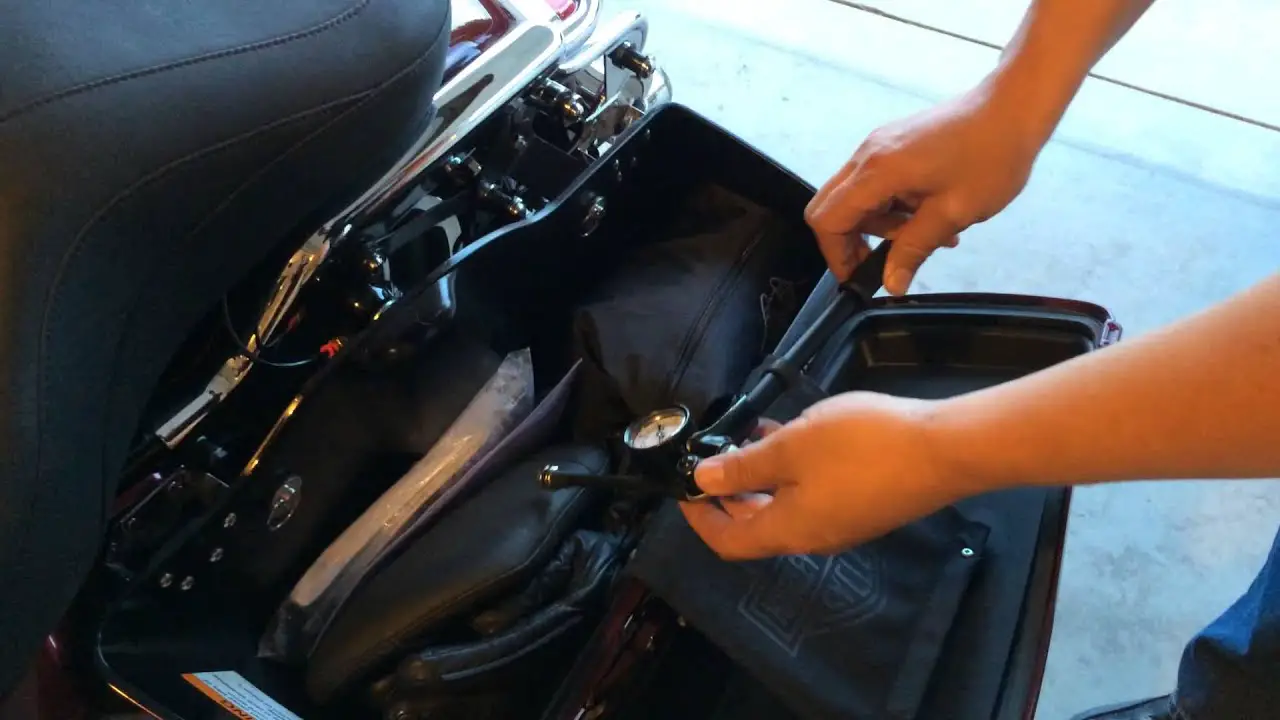
A convenient air valve is located between the saddlebag and rear fender for quick adjusting. To add air to the shocks on your Harley Davidson, you will need to use a hand air pump. It is important to identify the location of the air valve on your bike. |
When adjusting the air pressure, it is crucial to know the recommended air pressure for your specific model. Refer to the owner’s manual or consult a trusted Harley Davidson dealer for the correct air pressure guidelines. |
Tips for using a hand air pump for adjustment: Make sure the pump is properly connected to the air valve and secure. Begin pumping air into the shocks slowly and check the pressure frequently until the desired level is reached. It is recommended to adjust the pressure in small increments for more accurate results. |
Step 3: Adjusting The Pre-load On Air Shocks
Adjusting the pre-load on air shocks is an important step in optimizing the ride comfort on your Harley Davidson. Pre-load refers to the amount of tension on the spring and can affect how the shocks respond to different riding conditions. To adjust the pre-load, you need to locate the adjusting collar on your shocks. Turning the adjusting collar clockwise will increase the pre-load, while turning it counterclockwise will decrease it. It is essential to find the optimal pre-load setting for your riding style, as it can greatly enhance your overall riding experience by improving stability and control. Keep in mind that adjusting the pre-load may require some trial and error, so take the time to test different settings and monitor how it affects your comfort and handling on the road. |
Step 4: Fine-tuning The Rebound Damping Force
|
Adjusting air shocks on your Harley Davidson is an important step in achieving optimum performance and comfort during your rides. One of the key factors to consider is the rebound damping force, which refers to the shock’s ability to handle the compression and extension of the suspension. By using the knob on your air shocks, you can adjust the rebound damping force to suit your preferences.
When turning the knob clockwise, you can create less rebound damping force, resulting in softer shocks. Conversely, turning the knob counterclockwise will increase the rebound damping force, making the shocks firmer. It’s essential to find the right balance of rebound damping to ensure a smooth and controlled ride.
Remember, the adjuster will stop turning when it reaches the full soft or firm force. Experiment with different settings to find the ideal rebound damping force for your Harley Davidson. With the right adjustments, you can enhance your riding experience and enjoy a more comfortable and responsive suspension.
Step 5: Recommended PSI for Air Shocks On Different Harley Models
To properly adjust the air shocks on your Harley Davidson, it is important to consider the recommended PSI for your specific model. Referencing an air suspension pressure chart can provide valuable information for your reference. Different Harley Davidson models have different PSI recommendations for optimal performance and comfort.
When determining the right PSI for your bike, there are a few factors to consider. First, it is important to take into account the weight of the rider and passenger. Heavier loads may require higher PSI to maintain proper suspension balance. Additionally, it is important to adjust the PSI based on your riding style and preferences. Some riders may prefer a softer suspension for a smoother ride, while others may prefer a firmer suspension for better handling.
Overall, adjusting the air shocks on your Harley Davidson can greatly enhance your riding experience. Take the time to properly adjust the PSI to ensure optimal comfort and performance.

Credit: www.denniskirk.com
Step 6: Troubleshooting Common Issues With Air Shocks
Adjusting air shocks on your Harley Davidson can greatly improve your riding experience. However, it is important to troubleshoot any common issues that may arise with your air shocks. One common issue is air leaks in the suspension system, which can lead to reduced performance and discomfort while riding. To identify signs of air leaks, closely inspect your shocks for any visible damage or wear. Additionally, check for any loss of air pressure in your shocks. If you identify an air leak, the next step is to fix it. This can be done by tightening any loose connections or replacing damaged components. It is also important to regularly check the air pressure in your shocks to ensure they are properly inflated. Excessive bouncing or bottoming out can be indicators of insufficient air pressure. If you are experiencing these issues, it is recommended to seek professional help for suspension issues. They can diagnose and fix any underlying problems that may be affecting the performance of your air shocks.
Step 7: Maintenance Tips For Air Shocks
Adjusting air shocks on a Harley Davidson is an essential part of maintaining optimal performance and comfort on your bike. Regular inspection and cleaning of the air valve is necessary to ensure proper function. Lubricating the adjuster knobs and collar threads helps prevent corrosion and makes adjustments easier. Following a recommended maintenance schedule for your air shocks is crucial to keep them in good condition. Signs such as loss of air pressure, excessive bouncing, or bottoming out indicate the need for replacement or repair. By taking care of your air shocks and following these maintenance tips, you can enjoy a smooth and comfortable ride on your Harley Davidson.
FAQs On How To Adjust Air Shocks On Harley Davidson
How Much Air Should Be In Harley Rear Shocks?
The recommended air pressure for Harley rear shocks varies depending on the specific model and load. It is important to refer to your motorcycle’s owner manual or consult a Harley Davidson dealer for the correct pressure settings. Adjusting the air shocks can improve ride quality and handling.
Can Air Shocks Be Adjusted?
Yes, air shocks can be adjusted. You can adjust the air pressure in the shocks to make them softer or firmer, depending on your preference and riding conditions. There is a knob on the shocks that can be turned clockwise or counterclockwise to adjust the rebound damping force.
Make sure to follow the manufacturer’s instructions and use the recommended air pressure for your specific model.
What PSI Should Air Shocks Be Set At?
Air shocks on a Harley Davidson should be set at a PSI (pounds per square inch) based on the rider’s weight and preference. It is recommended to refer to the owner’s manual or consult a Harley Davidson dealer for the recommended PSI range for your specific model.
How Do You Adjust Air Shocks On A Harley Davidson?
To adjust air shocks on a Harley Davidson, locate the convenient air valve located between the saddlebag and rear fender. Use a hand air pump like Harley’s to add or release air pressure to adjust the shocks according to your preference.
Conclusion
Adjusting air shocks on your Harley Davidson is an essential task for optimal performance and riding comfort.
By following the steps outlined in this guide, you can ensure that your suspension system is properly adjusted to your specific needs.
Remember to use a hand air pump like the one provided by Harley Davidson for accurate pressure adjustments.
By maintaining the correct air pressure in your shocks, you can experience a smoother ride and improved handling.
So don’t wait any longer, get out there and adjust those air shocks to enjoy the full potential of your Harley Davidson.
Happy riding!

